TeamSpeak is a communication application that uses VOIP (voice-over-Internet protocol) technology to allow users to communicate with others through the Internet. When using TeamSpeak, the user’s computer will automatically connect to the TeamSpeak server through the TeamSpeak client. Users can immediately communicate with other users. The main target of the TeamSpeak application itself is gamers. This is because most games are played by several players (multiplayer). So, communication with voice will be required to foster a sense of enthusiasm in playing the game. This TeamSpeak server can be enjoyed for free if it has no more than 32 slots. This tutorial will show you how to install TeamSpeak on Ubuntu 24.04.
Prerequisites
- Ubuntu 24.04 VPS with at least 1GB of RAM
- SSH root access or a regular system user with sudo privileges
Conventions
# – given commands should be executed with root privileges either directly as a root user or by use of sudo command
$ – given commands should be executed as a regular user
Step 1. Update the System
First of all, we need to log in to our Ubuntu 24.04 VPS through SSH:
ssh root@IP_Address -p Port_number
You must replace ‘IP_Address‘ and ‘Port_number‘ with your server’s respective IP address and SSH port number. Additionally, replace ‘root’ with the username of the system user with sudo privileges. Subsequently, let us ensure that we are operating on Ubuntu 24.04. You may verify this by executing the command provided below.
# lsb_release -a
You should get this as the output:
No LSB modules are available.
Distributor ID: Ubuntu
Description:    Ubuntu 24.04.1 LTS
Release:        24.04
Codename:       noble
Step 2. Add a System User
Installing the TeamSpeak server is fairly easy. This step will create a new system user to run our TeamSpeak service. Let’s execute this command below to add a new system user.
# useradd -m -d /opt/teamspeak -Urs /bin/bash teamspeak
The command above will create a new system user called ‘teamspeak’. Its home directory is /opt/teamspeak, which we will use for the installation.
Step 3. Download TeamSpeak Server
We created a new system user in the previous step. Let’s switch to that user and then download TeamSpeak. You will want to check TeamSpeak download page to see whether they have a more recent version to download at https://teamspeak.com/en/downloads/#server
# su - teamspeak
$ wget https://files.teamspeak-services.com/releases/server/3.13.7/teamspeak3-server_linux_amd64-3.13.7.tar.bz2 -O teamspeak-server.tar.bz2
Wait until it finishes, then run this command to extract the file.
$ tar xvfj teamspeak-server.tar.bz2 --strip-components 1
The command above will extract the file directly in the path where we execute the command, /opt/TeamSpeak.
Step 4. Accept TeamSpeak Terms
To be able to start the TeamSpeak server, we must accept the TeamSpeak license terms. To do this, execute the command:
$ touch /opt/teamspeak/.ts3server_license_accepted
This creates a file indicating that you accepted these license terms. Now, let’s log out from user TeamSpeak.
$ exit
Step 5. Create TeamSpeak Systemd Unit file
We need to create a systemd service file to manage the newly installed TeamSpeak Server. To complete this step, let’s run the command below.
# systemctl edit teamspeak --force --full
The command above will bring you to a text editor. Insert the following content into the systemd unit file.
[Unit]
Description=Teamspeak Service
Wants=network.target

[Service]
WorkingDirectory=/opt/teamspeak
User=teamspeak
ExecStart=/opt/teamspeak/ts3server_minimal_runscript.sh
ExecStop=/opt/teamspeak/ts3server_startscript.sh stop
ExecReload=/opt/teamspeak/ts3server_startscript.sh restart
Restart=always
RestartSec=15

[Install]
WantedBy=multi-user.target
Save the file, then exit. And do not forget to reload the systemd service and then run TeamSpeak.
# systemctl daemon-reload
Let’s run the service now and tell the system to run in upon server reboot.
# systemctl enable --now teamspeak
TeamSpeak is now running. You can check this by executing this command:
# systemctl status teamspeak
It will print you this message:
[email protected]:~# systemctl status teamspeak
● teamspeak.service - Teamspeak Service
     Loaded: loaded (/etc/systemd/system/teamspeak.service; disabled; preset: enabled)
     Active: active (running) since Thu 2024-10-17 06:55:37 CDT; 6s ago
   Main PID: 2367 (ts3server)
      Tasks: 21 (limit: 4613)
     Memory: 11.6M (peak: 12.1M)
        CPU: 9.003s
     CGroup: /system.slice/teamspeak.service
             └─2367 ./ts3server

Oct 17 06:55:38 ubuntu24.rh ts3server_minimal_runscript.sh[2367]:                       I M P O R T A N T
Oct 17 06:55:38 ubuntu24.rh ts3server_minimal_runscript.sh[2367]: ------------------------------------------------------------------
Oct 17 06:55:38 ubuntu24.rh ts3server_minimal_runscript.sh[2367]:       ServerAdmin privilege key created, please use it to gain
Oct 17 06:55:38 ubuntu24.rh ts3server_minimal_runscript.sh[2367]:       serveradmin rights for your virtualserver. please
Oct 17 06:55:38 ubuntu24.rh ts3server_minimal_runscript.sh[2367]:       also check the doc/privilegekey_guide.txt for details.
Oct 17 06:55:38 ubuntu24.rh ts3server_minimal_runscript.sh[2367]:        token=iLsIgpUlUEsoBllzv6haLfkfq0JxTH5E5ONOybtR
Oct 17 06:55:38 ubuntu24.rh ts3server_minimal_runscript.sh[2367]: ------------------------------------------------------------------
Oct 17 06:55:38 ubuntu24.rh ts3server_minimal_runscript.sh[2367]: 2024-10-17 11:55:38.450015|INFO    |Query         |   |listening for query on 0.0.0.0:10011, [::]:10011
Oct 17 06:55:38 ubuntu24.rh ts3server_minimal_runscript.sh[2367]: 2024-10-17 11:55:38.450282|INFO    |              |   |creating QUERY_SSH_RSA_HOST_KEY file: ssh_host_rsa>
Oct 17 06:55:38 ubuntu24.rh ts3server_minimal_runscript.sh[2367]: 2024-10-17 11:55:38.545827|INFO    |              |   |myTeamSpeak identifier revocation list was downloa>
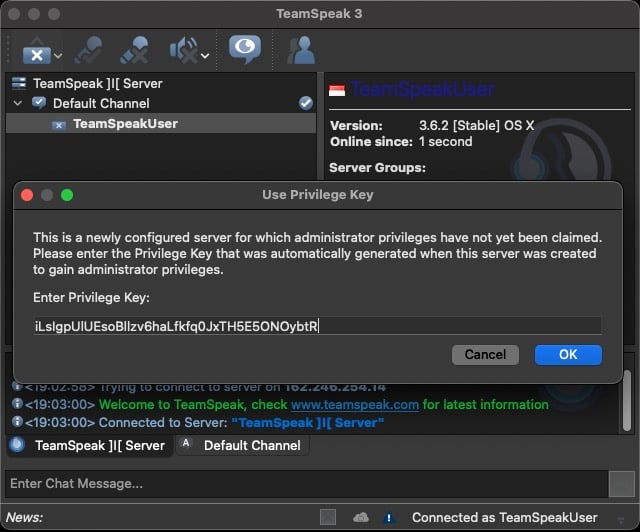
Pay attention to the token value, iLsIgpUlUEsoBllzv6haLfkfq0JxTH5E5ONOybtR. This is the token key we need for the next step. Please note that the token key is unique; you will get your own.
Step 6. Create Admin Password
We will be asked for the admin password to connect from the TeamSpeak client to the TeamSpeak server. In this step, we will create an admin password for TeamSpeak.
First, stop the TeamSpeak service with the following command:
# systemctl stop ts3server
Then, switch to user ‘teamspeak’ and start the TeamSpeak service by passing the password parameter:
# su - teamspeak
$ ./ts3server_startscript.sh start serveradmin_password=m0d1fyth15
Next, we must whitelist your Teamspeak server and client IP addresses. Let’s add your server IP and client IP to the TeamSpeak allowlist file:
$ nano /opt/teamspeak/query_ip_allowlist.txt
Add your server IP address and your computer’s public IP address.
Step 7. Connect to TeamSpeak Server
Go to the TeamSpeak download page, download the TeamSpeak client for your computer, install it, and then run the application.
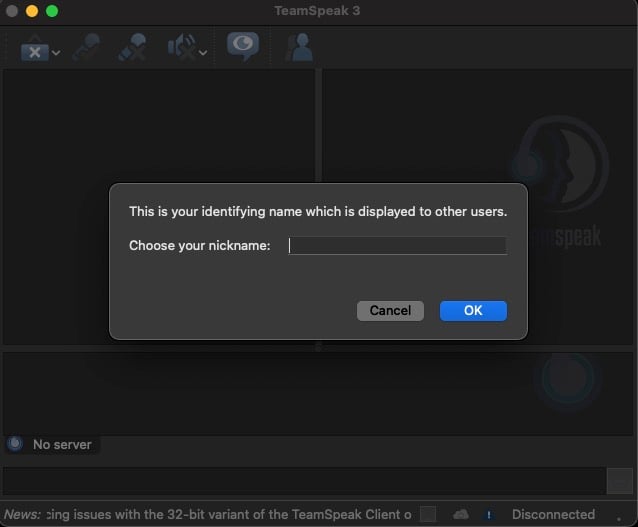
You will be asked to create a nickname when running the TeamSpeak client for the first time.

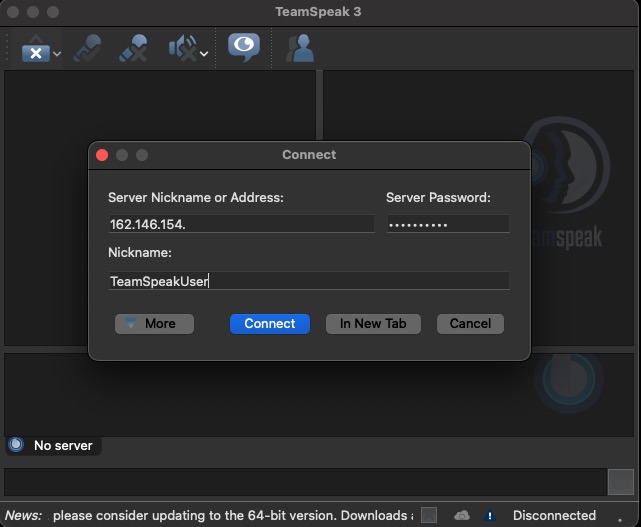
Click on OK, then connect to the server.

After clicking on the Connect button, you will be asked for the privilege key. This is the token key we saved in the previous step.

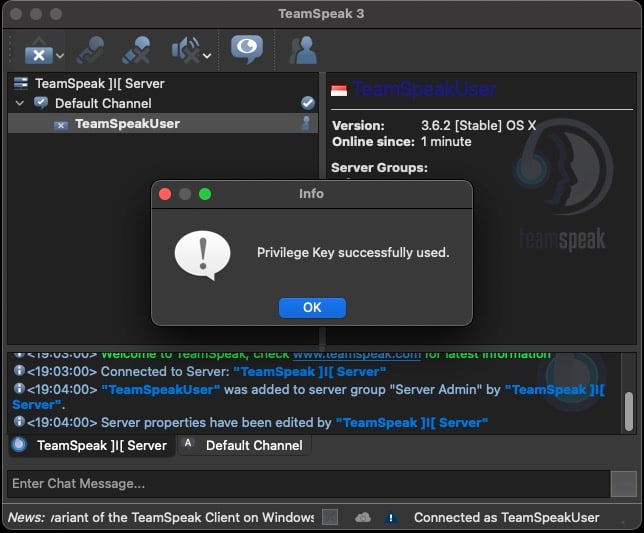
Click OK to continue.

After being connected to the TeamSpeak server, you can stop the service and start it using the systemd.
# su - teamspeak
$ ./ts3server_startscript.sh stop
$ exit
Finally, we can start it again.
# systemctl start teamspeak
That is all! You have successfully learned how to install TeamSpeak on Ubuntu 24.04 and connected to it using your desktop TeamSpeak client.
If you want to host a TeamSpeak server with high-end hardware at an affordable price, check out our Ubuntu 24.04 VPS hosting plans and start hosting any software you want with dedicated resources.
If you liked this post on how to install TeamSpeak on Ubuntu 24.04, please share it with your friends or leave a reply below.
