ownCloud is an enterprise file sharing solution for online collaboration and storage that you can use to sync and share your files, calendar, contacts and much more. It’s functionality is similar to the widely used Dropbox but with a very significant difference. OwnCloud is free and open source thus allowing anyone to install and operate it free of charge on a Linux Cloud.
In this article, we will install ownCloud on an Ubuntu 16.04 Cloud and configure Nginx to serve the ownCloud website. We assume that you have a working LEMP (Linux, Nginx, MySQL and PHP-FPM) stack on your Ubuntu 16.06 server.
REQUIREMENTS
We will be using our LC VPS-1 Cloud VPS hosting plan for this tutorial.
LOG IN TO YOUR SERVER VIA SSH
# ssh root@server_ip
You can check whether you have the proper Ubuntu version installed on your server with the following command:
# lsb_release -a
You should get this output:
Distributor ID: Ubuntu
Description:    Ubuntu 16.04 LTS
Release:        16.04
Codename:       xenial
UPDATE THE SYSTEM
Make sure your server is fully up to date using:
# apt-get update && apt-get upgrade
After this update is completed, install some much-needed PHP packages. Enter the following command:
# apt-get install wget php-zip php-curl php-mysql php-gd php-xml
Restart PHP-FPM:
# systemctl restart php7.0-fpm
You can now create a database that you can use later when installing ownCloud from a browser. Enter MySQL as root and execute the following queries:
# mysql -u root -p

mysql> create database owncloud;

mysql> grant all privileges on owncloud.* to owncloud@localhost identified by 'your_password';

mysql> flush privileges;

mysql> exit
Bye
INSTALL OWNCLOUD
We will download the latest ownCloud version (9.1.1) into the /opt directory, unpack the archive and then move it to /var/www/html/. The below commands do exactly that:
# cd /opt/

# wget https://download.owncloud.org/community/owncloud-9.1.1.tar.bz2

# tar xfv owncloud-9.1.1.tar.bz2

# mv owncloud/ /var/www/html/owncloud/
Assign the proper ownership of files and directories so your Nginx web server can actually read the data:
# chown www-data: -R /var/www/html/owncloud/
Now create a config file in Nginx so you can use your domain to access ownCloud. Open the below file, we are using nano as text editor, however, you can use one according to your needs.
# nano /etc/nginx/sites-available/your_domain
Paste the underneath lines:
server {
    server_name your_domain;

    access_log /var/log/nginx/your_domain-access.log;
    error_log /var/log/nginx/your_domain-error.log;
    root /var/www/html/owncloud;

    location / {
        index index.php;
        try_files $uri $uri/ /index.php$is_args$args;
    }

    location ~ \.php$ {
        include snippets/fastcgi-php.conf;
        fastcgi_pass unix:/run/php/php7.0-fpm.sock;
        fastcgi_param SCRIPT_FILENAME $document_root$fastcgi_script_name;
    }
}
Don’t forget to replace the your_domain values with your actual domain. Save and close the file. Then, enable it by creating a symlink:
# ln -s /etc/nginx/sites-available/your_domain /etc/nginx/sites-enabled/
Test the Nginx configuration:
# nginx -t
If everything is successful, restart Nginx so the changes can take effect:
# service nginx restart
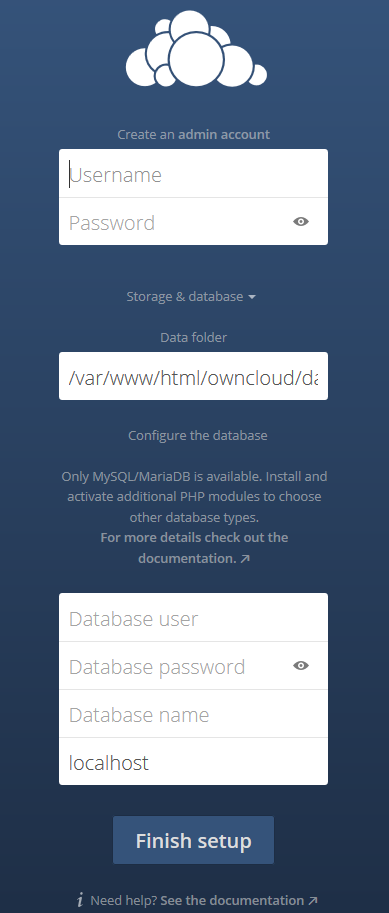
Now open your favorite web browser and navigate to http://your_domain to finish the ownCloud installation. You will be welcomed by the installation page as shown in the image below:
Create your admin account, configure the database with the values that you used during the database creation and finish the installation.
Congratulations, you now have a working ownCloud installation on your Ubuntu 16.04 Cloud.
Of course, you don’t have to do any of this if you use one of our Linux Cloud Hosting services, in which case you can simply ask our expert Linux admins to install ownCloud stack for you. They are available 24×7 and will take care of your request immediately.
PS. If you liked this post please share it with your friends on the social networks using the buttons on the left or simply leave a reply below. Thanks.

